OBS Studio, a widely used open-source broadcasting software, now comes with built-in auto-captioning which is still quite perfectible.
Thankfully, various third-party plugins and tools allow you to generate real-time captions and subtitles for your streams and recordings.
This guide will walk you through everything you need to know about adding captions and subtitles in OBS.
Does OBS Have Auto Captions?
OBS Studio has included an experimental built-in auto-captioning feature. It leverages Google Speech Recognition to transcribe speech in real time and overlay captions onto your broadcast. But it's still perfectible.
Thanks to its flexible plugin support, users can integrate other third-party solutions to generate live captions for streams and recordings.
Web-based tools like Web Captioner and VDO.Ninja provide live captioning, allowing you to display captions as a browser source in OBS.
Although some streaming platforms, such as YouTube and Facebook Live, offer automatic captions, these captions are generated by the platform itself and are not visible within OBS.
How to Implement Auto Captions on OBS
OBS supports external tools for real-time captioning. Here’s how to set up auto captions in OBS:
Step 1: Choose a Captioning Tool
OBS Built-in Closed Captioning – Uses Google Speech Recognition to transcribe spoken words.
Web Captioner – A browser-based live captioning service.
VDO.Ninja – Provides real-time subtitles for streamers.
Step 2: Install and Configure the Plugin (If Using OBS Closed Captioning Plugin)
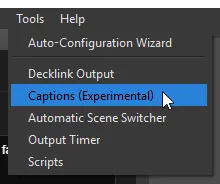
Open OBS and navigate to Tools > Captions.
Select your microphone or desktop audio source.
Adjust language, font, and display settings.
Step 3: Configure Web Captioner or VDO.Ninja (If Using a Browser-Based Tool)
Open Web Captioner or VDO.Ninja in your browser.
Allow access to your microphone.
Customize the caption display.
Copy the provided browser source link and paste it into an OBS Browser Source.
Step 4: Test Captions in OBS
Speak into your microphone to verify that captions appear correctly in your OBS scene.
Adjust text size and placement for better readability.
Step 5: Start Your Live Stream or Recording
Begin your broadcast while monitoring caption accuracy.
Adjust settings in your captioning tool if necessary.
How to Add Captions Manually or Import Subtitle Files in OBS
If you prefer manual control over your captions, OBS allows you to add them manually using a text source :
In OBS, click + in the Sources panel and select Text (GDI+).
Enter captions manually and adjust font, size, color, and position.
Update captions manually during your stream.
Ensure that captions align with spoken content.
Use scene switching to display different captions at specific moments.
How to Generate Quality OBS Captions & Subtitles with Checksub
For a more efficient and professional approach to captioning, Checksub provides an AI-powered solution that simplifies the entire process. Here’s how to use Checksub step by step:
Step 1: Generate Automatic Captions
Log in to the Checksub platform and upload your recorded video or paste your live stream link.
Select the original language of your content to ensure accurate transcription.
Once your video is uploaded, Checksub will automatically transcribe the spoken words.
Step 2: Edit and Sync Captions
Use Checksub’s subtitle editor to fine-tune the captions.
Adjust the text automatically, correct any misinterpretations, and synchronize captions with the video’s audio. Split long sentences into smaller, readable segments to improve viewer comprehension.
Choose the font, size, and color that match your branding. Position captions in a way that does not obstruct key visuals. Add styling effects to improve readability and accessibility.
Step 3: Export your Captions in Multiple Formats
Select the appropriate export format depending on your needs:
SRT/VTT files for uploading to streaming platforms like YouTube or Facebook.
Burned-in captions (embedded directly into the video) for platforms that do not support external subtitle files.
Want to add professional captions to your OBS live streamings or recordings ? Try Checksub for free.
Join 400+ companies translating their videos with Checksub.


%20(1).webp)
